How to Manage Calendar
Introduction
The Calendar is a location in SecurityTrax where you can go to view all scheduled Appointments of any Calendar Type listed by Users.
The Calendar features an array of filters and settings to allow you to customize your viewing experience. From the Calendar you are able to access the Appointment itself, as well as go directly to the Customer who has the Appointment.
This page will help you manage the Calendar on the admin side. This includes being able to view the Calendar, view and edit Appointments and quickly access information pertinent to the Appointment.
Note: Proper permissions are required.
Terms
View the complete list of terms used in Calendar
Appointment
An Appointment is a scheduled time that a User is assigned to visit a Customer. Appointments. Appointments are managed on the Customer. A Work Order is required in order for an Appointment to be created. Click here to learn more about Work Orders and here to learn more about Appointments.
Calendar
A location where you can view all scheduled Appointments broken down by hours of the day. Calendar features a variety of filters and settings which you can utilize to see your Appointments. On the Calendar you are also able to move Appointments from one user to another and even lengthen or shorten any selected Appointment.
Calendar Check in Details
The Calendar Check-in Details provides a breakdown of the Check-In state of the selected Appointment. These are available to the User assigned to the appointment can enter during the Tech Today and Tech At Work Process . This is also available and can be adjusted on the Company Calendar by any User given proper permissions.
- On The Way - When the Tech has left from Home or Previous Appointment.
- Checked In - When the Tech has Arrived at the Appointment.
- Checked Out - When the Tech has Departed the Appointment.
Calendar Filters
The following filters are available on Company Calendar:
- Technicians
- Sales Reps
Calendar Preview
The Calendar Preview allows you to see easily see and access information relevant to the appointment. The Calendar Preview is seen when you hover over any Appointment on the Calendar. The Calendar Preview allows the following options to be done:
Select Check-In Details
Edit Appointment
Access the Customer
Access the Map (on your default Map site)
Duplicate the Appointment
Calendar Settings
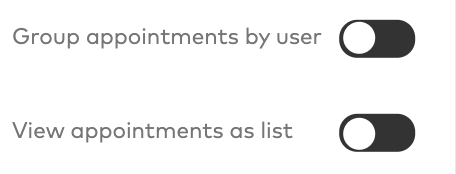
Calendar Settings allow you to adjust how and what you view on the Company Calendar page. The following options are available:
- Group Appointments by User - Displays the Calendar as a list of Users with their appointments
- View Appointments as List - Displays the Calendar as a list of appointments without the time of day column
- Note: This option is not available on Mobile
- See Technician Appointments - Shows Appointments of Calendar Type Install, Service and Removal
- See Sales Appointments - Shows Appointments of Calendar Type Sales
Calendar Status
The Calendar status is determined based on Check In information on the Appointment.
- On Time (Green) - User has checked-in On Time to the Appointment within the scheduled time
- Late (Yellow) - User has checked-in late to the Appointment.
- Late (Red) - User has not checked-in to the Appointment and the appointment start time has passed.
- Done (Green) - User has checked-out of the Appointment within scheduled time.
- Done (Yellow) - User has checked-out of the Appointment after the scheduled time.
Calendar Sub Types
Calendar Sub Types are set on Company Settings. They allow you to further customize your appointments based on their initial Calendar Type (Sales, Install, Service, Removal).
You can set custom names and color types. These colors will be reflected on the appointments listed on the Company Calendar.
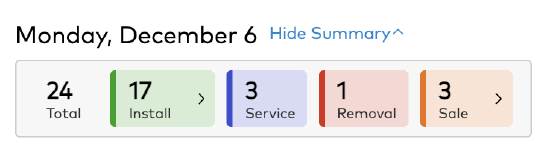
Calendar Summary
The Calendar Summary allows you to easily view the total number of appointments based on the Calendar Type and Sub Type.
Calendar Types
Calendar Types allow the User to break down Appointments into different types.
- Sales - Used for setting Lead Rep Appointments on a Lead.
- Install - Intended to be used for the first Appointment on the Customer.
- Service - Intended to be used for follow up Appointments on the Customer.
- Removal - Intended to be used for Appointments on the Customer where equipment is being removed.
- Time Off - Used to block off a portion of the Calendar for the User.
Date Navigator
When more than one day is selected, the Date Navigator allows you to click on the day you want to jump to and can easily navigate from day to day.
Date Picker
The Calendar Date Picker allows you to select multiple days to display on the Company Calendar.
Tech Today
Tech Today is the Technician's hub. Includes a list of their appointments for the day and list of on-hand inventory and what is needed to complete all appointments for the day. Click here to learn more.
Tech At Work
Tech at Work is where the Technician has all the tools needed to work the appointment. From here the Technician can also navigate to any part of the site for any reason and easily navigate back to the appointment. To navigate back to Tech Today, select the Tech Today tab or select Tech Today on the breadcrumbs in the secondary navigation bar. Click here to learn more.
Work Orders
Work Orders allow you to group multiple Appointments together on a Customer. Click here to learn more.
Usage
View
- While logged into SecurityTrax, click on the Company menu
 .
. - In the Company section, select Calendar.
.png?revision=1)
Date Picker
The calendar will by default show Today. To view other days, select the days from the Date Picker icon or click on the days from the week days listed at the top:

Date Navigator
When more than one day is selected, you will see a Date Navigator on the top right. Here you can click on the day you want to jump to and can easily navigate from day to day.

Show Summary
Allows you to easily see all appointment information for the selected day. The Appointments are broken down by type and subtype (if applicable).

Calendar Settings
Allows you to select different ways to view the Calendar page.
Group Appointments by User
Sorts by Users on the left (last name A-Z) and shows each selected day (descending).
.png?revision=1)
View Appointments as List
Displays all appointments by User (Scheduled Time descending). This list displays the following information: Scheduled Time, Type, Customer, Location, Status, On the Way, Arrival, Departure and Incomplete Reason.
Note: Appointments as List is not available on Mobile.
.png?revision=1)
Filters
On top of Filters, you can also use the Calendar Settings to display only Technician Appointments or only Sales Appointments by utilizing the See Technician Appointments and See Sales Appointments sliders.'

Manage Appointment
To move an appointment
- Click on the appointment.
- Drag the appointment to the desired technician and time.
Note: You can only move an appointment within the same day. This feature is not available on Mobile.
To lengthen/shorten an appointment
- Drag on the left or right edge of the appointment to the desired length of time.
- Note: To shorten the appointment, you'll need to drag the left or right edge beneath the current appointment-time box (when the Drag & Drop feature is functioning correctly, you will see the appointment-time box enclosed by dots).
- Note: This feature is not available on Mobile.
To view/Edit Appointment Preview Information
Click on the appointment. The Preview will appear above the appointment
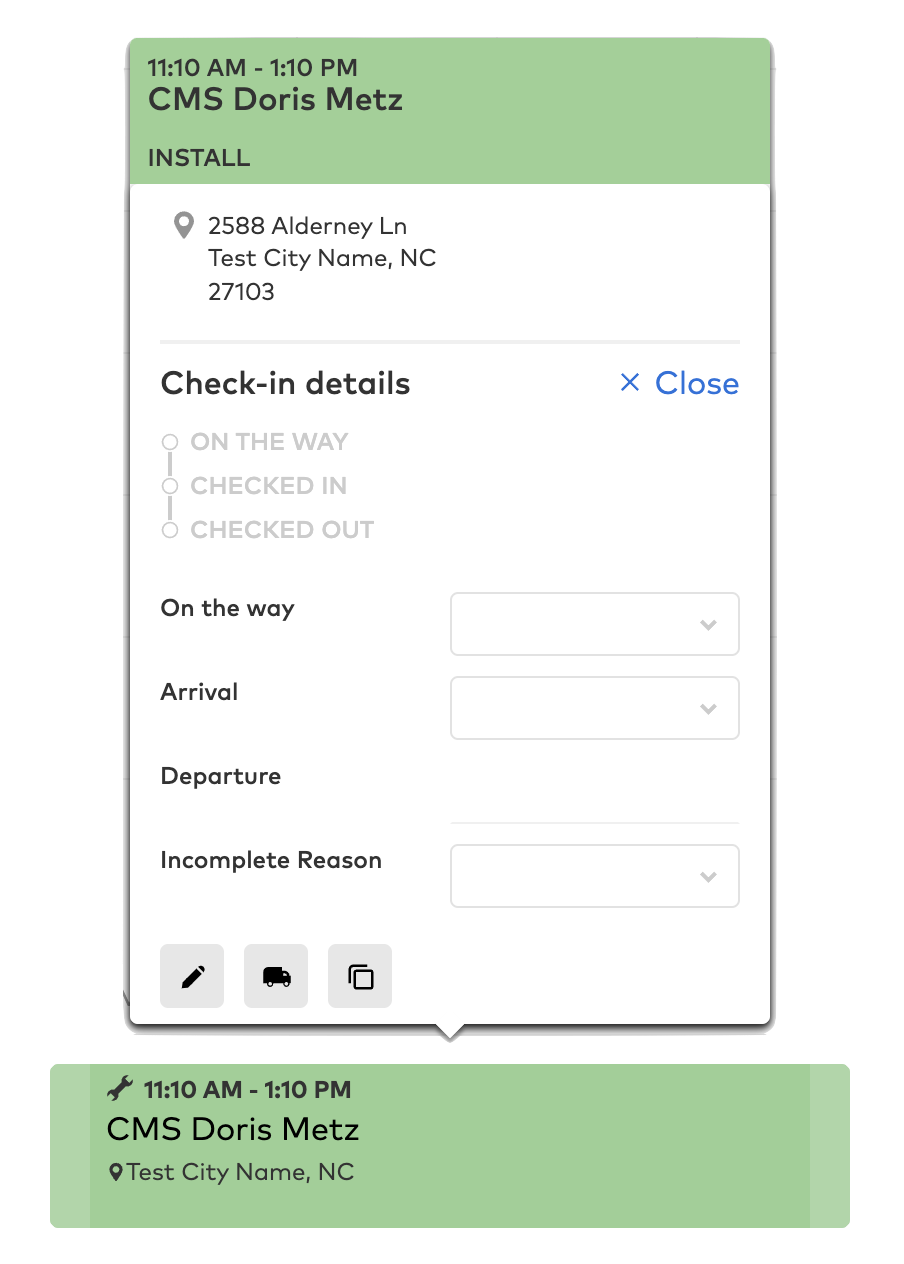 Check-in details
-
Click Edit
 on the preview.
 - The preview will expand downwards with the following options
- On the way
- Arrival
- Departure
- Incomplete Reason
Work Order
-
Click the Truck
 icon on the preview.
 - The Work Order window will appear.
Edit Appointment
- Click the Edit
 icon on the preview.
 - The edit Appointment window will appear.
- Make desired changes.
- Click Save.
Access Customer
- Click on the Customer name on the preview.
- Note: This will take you directly to the customer.
Access Map
- Click on the Map
 icon on the preview.
- Note: This will open in a new tab in your default map site with focus on that address.
Duplicate Appointment
- Click on the Duplicate
 icon on the preview.
 - The duplicate Appointment window will appear.
- Make any adjustments.
- Click Save.