2) Getting To Know Permissions
Understanding and setting up Permissions in SecurityTrax is likely the most time consuming part of your set up. Careful thought and planning is necessary. However, once completed, your instance of SecurityTrax will become an even more powerful tool to help run your business.
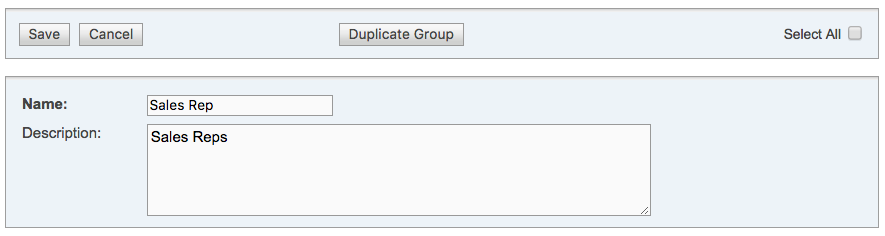
SecurityTrax comes with four default Permissions groups: Managers, Owners, Sales Reps, and Technicians. Note that you can change the names of the default permission groups and add more if you choose.
The Owners group is the only group which by default comes with permissions set to nearly all items (some access isn't granted for reasons described later). The individual listed on the SecurityTrax SaaS Agreement as the primary contact will be made a member of the Owners group by default.
The Managers, Sales Reps, and Technicians groups purposefully come with NO Permissions granted. This allows you to set each of these groups with Permissions that best fits how you do business because every business is different.
The most valuable exercise you can perform is to carefully review what each Permission does in SecurityTrax.
Sample Permission
Let's configure your Sales Rep Permission Group and review the various Permissions as we go.
- Click on the Administration tab
- Click Permissions under the Organization section
- Click Sales Reps
Admin Section
Permissions in this section activate the Administration tab and grant access to the items found on the Administration tab.
If you wish to give access to anything on the Administration tab you'll also need to select the top 'Yes' checkbox for 'Administration Page'. Leaving it unchecked will hide the Administration tab.
Mouse over each Permissions listed on the left side of the screen and a small pop up window will display a brief description of what each item does.
Do you want your Sales Reps to have access to any of the items in this section? If not, move onto the Customers section. If yes, then use the checkboxes on the right to assign the applicable level of access:
View
Allows User to see information which has already been entered.
Create
Allows User to enter new information into blank fields and save, but User cannot modify the information if 'Modify' access hasn't been given.
Modify
Allows User to change information even after it has been saved.
Delete
Allows User to completely remove information/data from SecurityTrax.
Yes
Turns the respective Permission 'On' giving you full control over the Permission, as opposed to view/create/modify/delete. Leaving it unchecked turns the Permission 'Off'.
Typically, an organization would NOT give access to any Permissions in the Administrative section due to the sensitive information found in the Administration tab.
Again, mouse over each Permissions listed on the left side of the screen the view the small pop up window displaying a brief description of what each item does. Check the boxes based on the desired Permissions you wish to grant your Sales Rep Permission Group in the Administration section.
Customers Section
Permissions in this section activate the Customers tab and grant access to various buttons found at the top of a Customer Record along with information contained on the record (See 'Customer Record' in Onboarding: Definitions).
Mouse over each Permissions listed on the left side of the screen and a small pop up window will display a brief description of what each item does.
You'll see that some of the Permissions in this section have a small padlock and pencil icon. This icon indicates a field which will contain confidential information (for example: bank account numbers, credit card numbers, SSNs, etc.) By default, access to these items is turned off. To allow full access, including being able to see the entire piece of information instead of a masked version, check the 'Yes' checkbox. Checking the 'Yes' checkbox also allows the information to be edited even after it has been saved.
Do you want your Sales Reps to have access to any of the items in this section? If not, move onto the Leads section. If yes, then use the checkboxes on the right to assign the applicable level of access (View, Create, Modify, Delete, or Yes).
- Check the boxes based on the desired Permissions you wish to grant in the Customer section.
It's recommend that Sales Reps have View, Create, and possibly Modify access to the Customer tab (top check boxes), Customer Page - Contact Information, and Customer Page - Sale Information.
However, each business is different and you'll want to decide what you want your Sales Reps to access. For example, you may not want your Sales Reps to be able to Modify anything once it's saved without contacting their Manager first.
Lead Section
Permissions in this section activate the Leads tab and grant access to the various buttons found at the top of a Lead Record.
Mouse over each Permissions listed on the left side of the screen and a small pop up window will display a brief description of what each item does.
Do you want your Sales Reps to have access to any of the items in this section? If not, move onto the Reports section. If yes, then use the checkboxes on the right to assign the applicable level of access (View, Create, Modify, Delete, or Yes).
- Check the boxes based on the desired Permissions you wish to grant in the Leads section.
It's recommended that Sales Reps have View and Create access to Leads (top check boxes), Messages, and Notes.
Report Section
WARNING: Reports are NOT filtered by Permissions. This means Reports containing sensitive information (i.e. costs of equipment, funding information, etc.) will display the sensitive information to ANYONE who has access to those reports.
Permissions in this section activate the Reports tab and grant access to the various types of reports that can be created in SecurityTrax.
Mouse over each Permissions listed on the left side of the screen and a small pop up window will display a brief description of what each item does.
Do you want your Sales Reps to have access to any of the items in this section? If not, move onto the Reports section. If yes, then use the checkboxes on the right to assign the applicable level of access (View, Create, Modify, Delete, or Yes).
- Check the boxes based on the desired Permissions you wish to grant in the Reports section.
It's recommended that Sales Reps, at least until they have data entered into SecurityTrax, have NO access to the Reports section.
Roles Restriction Section
Permissions in this section allow access to receiving tickets, adjusting the Sales or Tech Scheduler, along with assigning roles to Users in your company (for example: Sales Rep, Tech Administrator, or Technician.)
Mouse over each Permissions listed on the left side of the screen and a small pop up window will display a brief description of what each item does.
Do you want your Sales Reps to have access to any of the items in this section? If not, move onto the Reports section. If yes, then use the checkboxes on the right to assign the applicable level of access (View, Create, Modify, Delete, or Yes).
- Check the boxes based on the desired Permissions you wish to grant in the Roles & Restrictions section.
It's recommended that Sales Reps have access to 'Can Have Tickets Assigned', 'Is a Lead Representative', and 'Is a Sales Representative'.
Schedulers Section
Permissions in this section grant access to add, change, or delete appointments in the Sales and Tech Scheduler.
Mouse over each Permissions listed on the left side of the screen and a small pop up window will display a brief description of what each item does.
Do you want your Sales Reps to have access to any of the items in this section? If not, move onto the Reports section. If yes, then use the checkboxes on the right to assign the applicable level of access (View, Create, Modify, or Delete).
- Check the boxes based on the desired Permissions you wish to grant in the Scheduler section.
Permission settings for this section vary from business to business This is up to you. We've seen companies who grant access to their Sales Reps and others who do not. There is also a Sales Scheduler that is turned off by default. It allows for sales appointments to be created. Contact SecurityTrax if you'd the Sales Scheduler turned on.
Ticket Section
Permissions in this section grant access to the Tickets tab.
Mouse over each Permissions listed on the left side of the screen and a small pop up window will display a brief description of what each item does.
Do you want your Sales Reps to have access to this item in this section? If not, you're ready to move onto setting Permissions for the next Permission Group (Managers or Technicians). If yes, then use the checkboxes on the right to assign the applicable level of access (View, Create, Modify, or Delete).
- Check the boxes based on the desired Permissions you wish to grant in the Tickets section.
- Click Save (It will take you back to the main Permissions screen where you'll see all of the Permission Groups).
It's recommended that Sales Reps have NO access to Tickets page. It would be reserved for management.
Conclusion
Now that you're somewhat familiar with the Permissions and what they do, it may be helpful to take a moment now and determine to which Permissions Group each of your Users will belong. (Owners, Managers, Sales Reps, Technicians, or a new group you need to create).
Creating a list of your Users on a piece of paper or an Excel spreadsheet for easy reference can help with placing your Users in the correct group. This list could be useful when we review the Organizational Hierarchy section later in the Onboarding: Supplemental Tasks section.
Also, there are no limits to the number of additional groups you can create. However, you'll want your Users to be members of only ONE group at a time. Having Users as members of multiple groups can create situations where Permissions in one group override Permissions in another group.
EXCEPTION: The only time you'd have a User as a member of two Permissions groups is when you'd want to create what we refer to as a 'Leaf Group'. A Leaf Group is when a User, typically an owner, who wants to have access to items in the Owners group AND be able to access leads, sell, or install a system. In this case, you'd create a new Permissions Group and name it Owner/Leads, Owner/SalesRep, OR Owner/Technician. All of the Permissions from the Owner group would be applied AND the checkbox for 'Is a Lead Representative', 'Is a Sales Representative', OR 'Is a Technician' would be checked in the Roles & Restrictions section of Permissions depending on the access desired.
The Permission Analyzer found in the upper left-hand corner is a search which allows you to search through your Users in your to see which Users have certain Permissions.
Repeat the steps listed in this section of the Onboarding process for the Owners, Managers, and Technician Groups - Or any other permission group that you find useful for your company/employees. Keep in mind that you can change the names of these groups or name new groups whatever you like.
For more information about SecurityTrax Permissions please see this video:
Managing Permissions from SecurityTrax on Vimeo.
Permission Duplicator
When working with permission groups you can now duplicate an existing permission group and use it as a template to create a new group with some of the permissions changed or modified. This will cut down on the time needed to create permission groups. To do this follow these steps:
- Click on the Administration Tab.
- Then under the Organization section click on Permissions.
- Now click the permission group that you would like to duplicate.
- Near the top click the button "Duplicate Group".
- Now rename the group you have duplicated and give it a description.
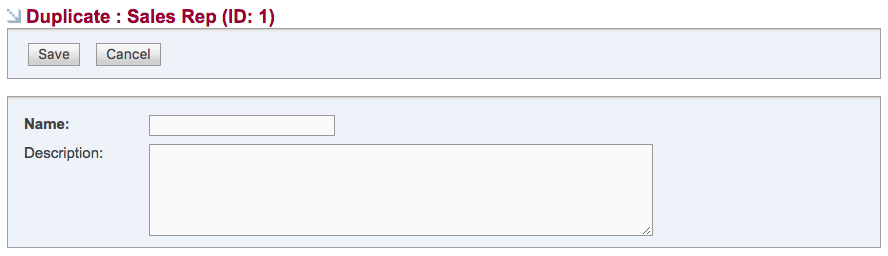
- Click Save and you will have a newly duplicated group that you can now customize and add users to.
- Customize the new permission group as needed and add the appropriate users to the new group.