Enhanced Inventory Setup
Introduction
SecurityTrax's Enhanced Inventory feature makes purchasing, delivering, receiving, and controlling your equipment a breeze. This article will help you understand how to make the most of the features and benefits offered through the optional Enhanced Inventory system.
Key Benefits:
- Auto-Replenishment: Ability to set restocking levels for your techs/warehouses/managers. When applicable thresholds are met inventory is automatically re-ordered with little or no effort.
- Electronic Orders: Completely eliminate human errors/intervention when submitting POs. Eliminate the need to call in or email orders to your vendors and let us do the hard work for you.
- Reduced Inventory Levels: Using our unique and tailored set of tools you can reduce the amount of on-hand inventory. Less money tied up with inventory means more money to invest in other areas of the business.
- Reporting: Complete insight into all movement/usage/losses/etc of equipment. Losses can be easily identified and attributed to the responsible parties, everyone is accountable.
TERMS TO KNOW BEFORE YOU START
Master Part List
The full list of parts managed under Administration.
Collection
A part from the master part list which logically represents 1 or more separate but distinct items from the master part list. Often referred to as a 'kit' by the separate vendors.
Package
A package is a set of items grouped together to facilitate easily adding items to customer accounts. They serve no other purpose.
Collections and packages are distinct and separate ideas in SecurityTrax. A collection is typically useful/utilized for ordering purposes only. Packages simplify adding equipment to an account/customer record only.
Equipment Vendor
An entity which provides equipment to your organization.
Recipient
A generic term referring to anything that can be the target of a PO. Users and Office Locations (warehouses) are currently the only available options.
Setup Equipment Vendors
The proper setup and configuration of vendors are critical to making things work smoothly.
To add a Vendor:
- Click on the Administration Tab
- Click Equipment Vendors under the Inventory & Equipment section
- Click Add Equipment Vendor located directly under the tabs at the top of the page
- Enter the basic information as appropriate.
Pay particular attention to the following:
- Account Number
For ADI please make this your 5 character prefix. Do not add a hyphen or 000 suffix to this field.
For all other vendors, simply put in your company account number.
- Connector
Select either; Alarm.com, ADI, EDIST, TechData, or Tri-Ed to use our automated connector to your vendor.
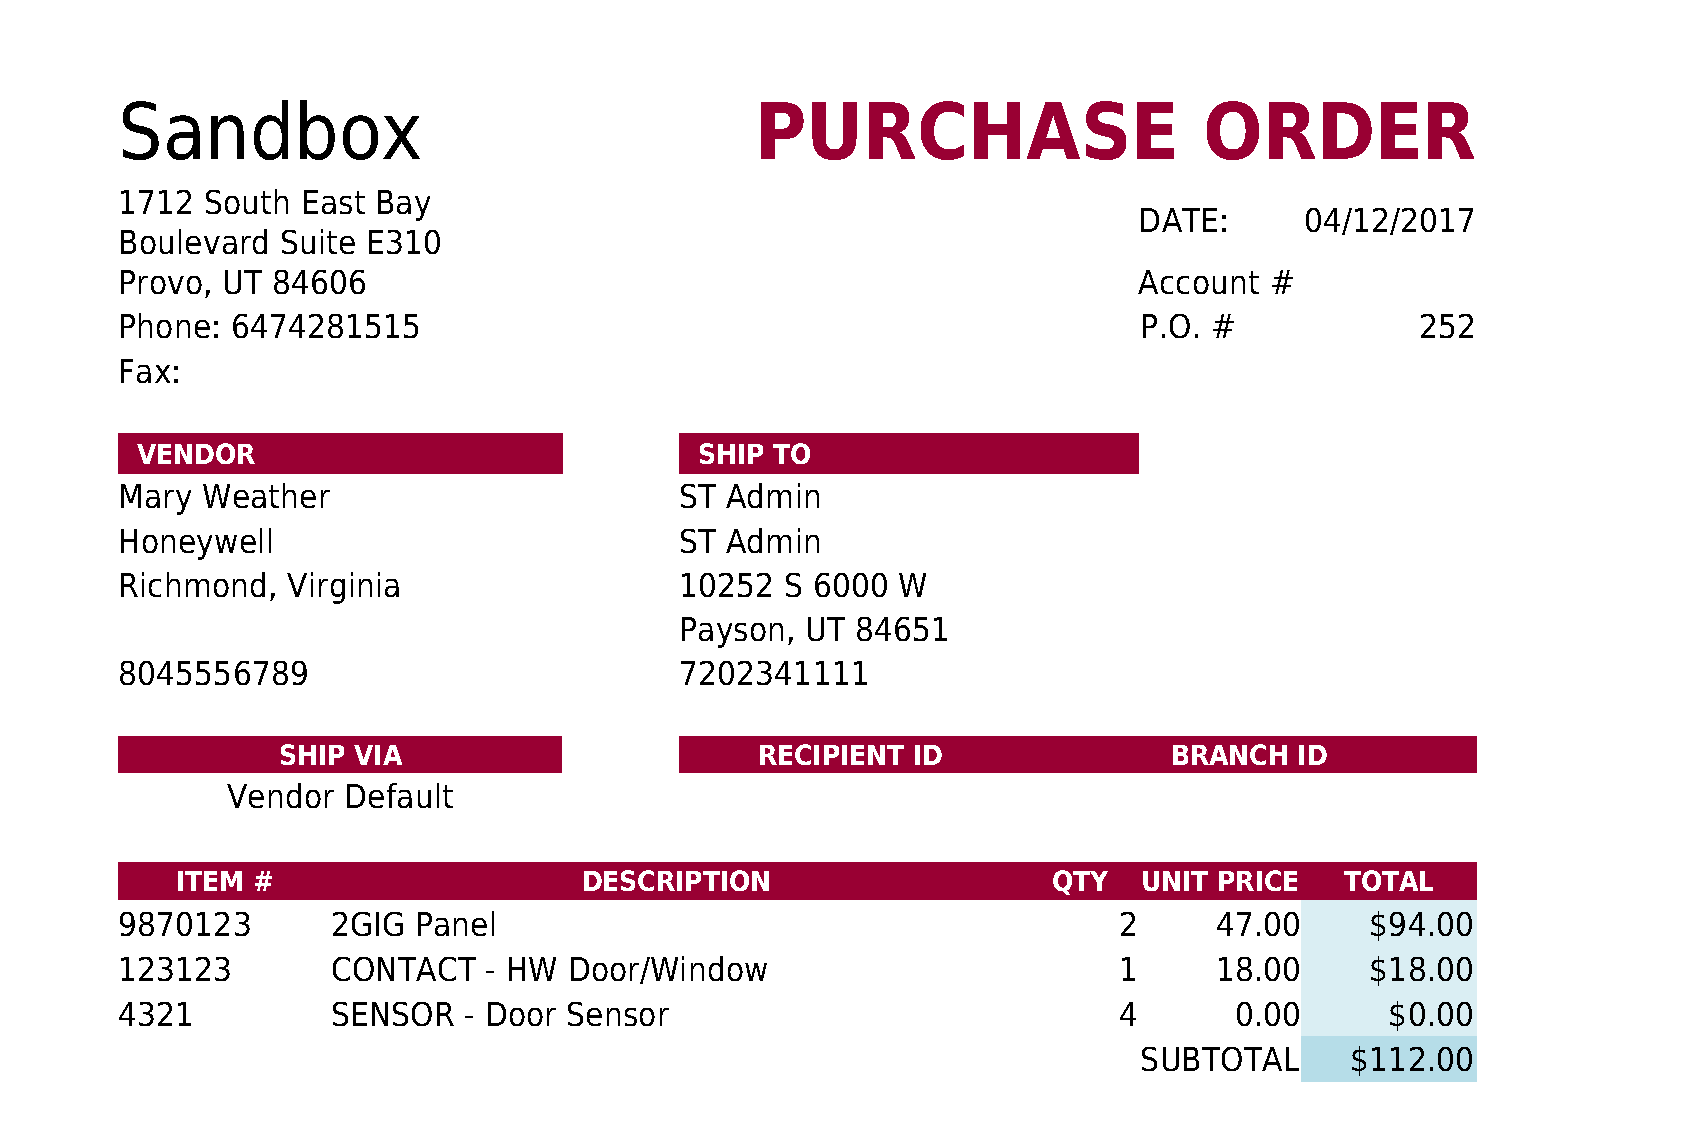
Select Email if we don't have the connector to your vendor and we can email them the PO for you. Below are some examples of the information that we send to the vendor.
Click to download .csv example of data sent to Vendor
Click to download .pdf example of PO sent to Vendor
If you would like to auto order your equipment from these vendors, email your points of contact with those vendors. Make sure to CC thansen@securitytrax.com and support@securitytrax.com , and tell them that you are going to be using Enhanced Inventory in SecurityTrax and would like to set up electronic orders.
NOTE: Correspondence with Vendors can take time, we advise that you send these emails early in the set-up process.
Equipment List
Enter each individual piece of equipment you install in SecurityTrax. This will allow you to easily move pieces to Technicians or Office Locations so your staff, Sales Reps, and Technicians always know what equipment you sell, how many of each piece is on hand, and where it's located.
A spreadsheet of all pieces of your Equipment can be uploaded into SecurityTrax. Submit a SecurityTrax Ticket (Step 2 of the Quick Start Guide). Hourly rates may apply.
To add individual pieces of Equipment follow the steps below.
REMINDER: All BOLD fields are required in order to save.
- Click on the Administration tab
- Click Equipment under Inventory & Equipment
- Click Add Equipment
- Type a name for the piece of Equipment
Manufacturer
The company who makes the piece of equipment.
Drop Down Menu Next to Manufacturer
Disregard this item.
Cost
The cost to your business for the individual piece of Equipment.
Installation Cost
The cost to your business for the installation of the piece of Equipment.
Point Value
Assign a value to each piece of equipment to assist with calculating commissions based on your point system.
Par Value
Similar to Point Value. It's not required to enter a value.
Wiretype
Is the piece of Equipment Wireless or Hardwired.
Active
Check to make the piece of Equipment show up in drop-down lists when adding equipment to a Customer.
Default Vendor
Identify which vendor you'd use to purchase the piece of Equipment. If you use multiple Vendors for the same piece of Equipment you'll need to create a new piece of Equipment in SecurityTrax for each Vendor.
SKU / UPC
Enter the SKU and/or UPC number for the piece of Equipment here.
Model
Enter the Model number of the piece of Equipment here.
Retail Value
Enter the amount you'll be charging your Customers for this piece of Equipment.
Install Bonus
Enter an amount your Technician could receive for installing the piece of Equipment.
Device Count
A field which can be used to assign 'points' or a 'count' to a piece of equipment to help with payroll calculations (For example, some equipment may be more difficult to sell or install. Additional values can be entered here). Could also be used for Equipment reporting purposes. Open to individual company usage.
Is Collection
Check if this piece of Equipment is a Collection (or Kit).
Items
This button shows up after a piece of Equipment is saved when the 'Is Collection' checkbox is checked. Designate the quantity of each piece of Equipment in the Collection (or Kit).
Automated Inventory Features (see Onboarding: Definitions)
Fulfillment Part
Replenish this specific piece of Equipment by ordering a Collection (or Kit) as opposed to buying the piece of Equipment a la carte. If a value is selected in this drop-down menu then the 'Is Collection' checkbox CANNOT be checked. (See Onboarding definitions for 'Collection' or 'Kit').
Disable Auto Replenish
SecurityTrax can be configured to automatically order pieces of Equipment if a Technicians level of Equipment has dropped to a User-defined quantity. When this box is checked those automatic shipments will be turned off.
Disable Base Adjustment
SecurityTrax can identify how much a particular piece of equipment is being used and automatically adjust the quantity that is ordered and shipped from the default vendor(s). Checking this box will require SecurityTrax to only use the User-defined base amounts instead of automatically adjusting amounts.
Fulfillment Sequence
This determines the order in which equipment will be auto replenished. For more information contact us.
- Click Save
- Complete the steps in this section of Onboarding for each piece of equipment you sell.
Collections
All individual parts should be added to your master part list. You should have distinct entries for all parts ordered a-la-carte, within collections, and for the collections themselves.
In other words, you need an entry for the collection, the panel, and all other items included in the collection as well.
Enter all fields as appropriate. Pay particular attention to the following:
- Default Vendor: When utilizing the auto replenish process this field determines which vendor the given part will be ordered from. If not set we cannot automatically restock the item for you.
- Fulfillment Part: If by default you want this part to be ordered only via a collection (ie: panels) then select the appropriate collection. If selected, the replenishment process will re-order the selected collection instead of ordering the part individually.
- Fulfillment Sequence: This determines the order in which parts are processed by the SecuirtyTrax replenishment engine. We generally will set this value to 9999 for all parts in your list and let you adjust according to your needs.
SecurityTrax handles the notion of kits fully (referred to as collections hereafter).

DESCRIPTIONS
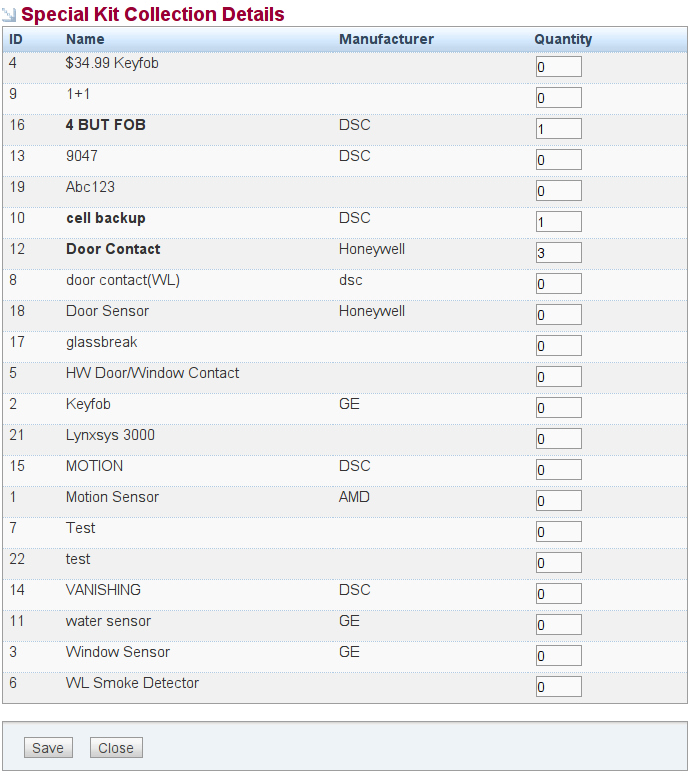
Is Collection
After selecting this and saving the part, a new "Items" button will appear.
Items (button)
Use this button to define the contents of the collection. Simply find the part in the list and input the appropriate quantity. If the part is no longer part of the collection simply remove the quantity completely.
NOTE
Collections are used strictly for ordering. When parts are received the collection is broken down such that the recipient receives the sum of items in the collection, not the collection itself.
Subsequently, recipients never have collections on hand. Only the parts within the collections.
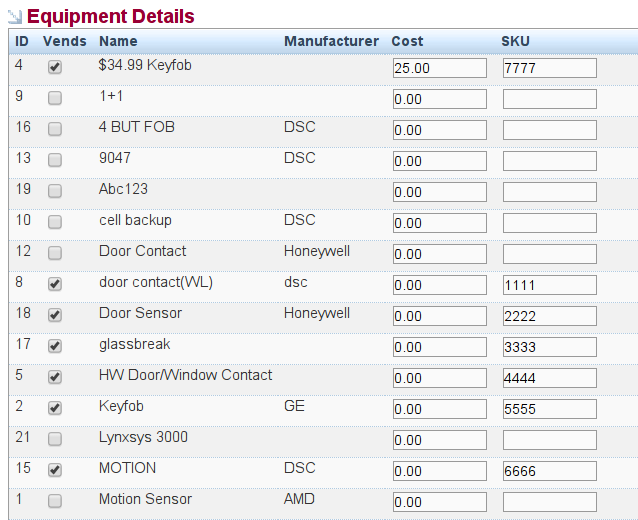
Setup Vendor Equipment Details
For orders to be processed properly you must set the appropriate values in the equipment details section.
For each vendor you must set up 3 critical items:
Vends
This box must be checked for the system to consider the item as one supplied by the given vendor. Please note that multiple vendors can provide the same item.
Cost
While not critical, it can be used for historical reporting and is generally helpful.
SKU
SKU is a generic term to represent the Part # as defined by the specific vendor. These are vendor specific and must be entered properly for electronic orders to process successfully.
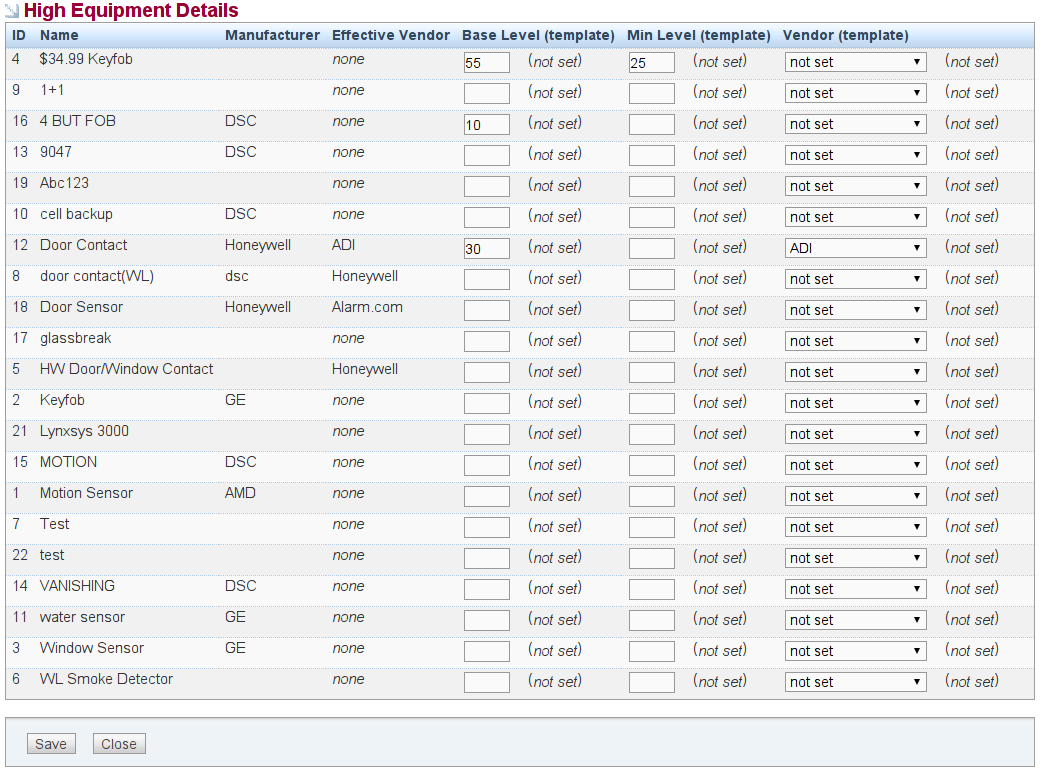
Create Equipment Templates
Templates are created with the simple goal of reducing long-term maintenance overhead. Each Recipient of inventory can have a single template applied. The various values applied to the template (such as base and min levels) are then inherited by the recipient but can be overridden on a case by case basis.
This makes it very easy to apply standard levels of inventory to groups of recipients. If adjustments are required you simply make the adjustment on the template and all applicable recipients will then inherit the new values.
Available Settings:
Base
Determines the amount of equipment the recipient should have on hand when fully replenished. For example, if a recipient has a base of 30 and currently has 10 on hand, 20 will be ordered to replenish to the base of 30.
If left blank, the part will not be processed for auto-replenishment. Make note that blank and 0 are different. 0 means the part will still be analyzed by the replenishment processor if a recipient is in the negative for any reason the proper quantity of parts would be ordered.
Min
If set, auto-replenishment will not occur until the recipient reaches or goes below the min. For example, if a recipient has a base of 30, a min of 10 and currently has 15 on hand, nothing will be ordered. Once the recipient drops to or below 10 the appropriate amount will be ordered.
The principal goal here is to prevent many small orders when unnecessary.
Default Vendor
Allows you at the template level to override the default vendor set on the item in the Master Part List. The order of preference is recipient -> template -> item.
For example, if a recipient does not have a template selected and has not overridden the default vendor at the recipient level, the default vendor set up on the part screen will be the effective part vendor.
Recipient Location Setup
Recipients are set up by either clicking on Administration -> Users or Administration -> Office Locations
Available Settings:
a) Inventory Recipient
Determine if the user or location is part of the inventory system and check the inventory recipient box. If left unchecked the entity will not be involved with inventory in any degree.
b) Auto Replenish
Check the Auto Replenish box so the recipient will be included in the auto-replenishment process.
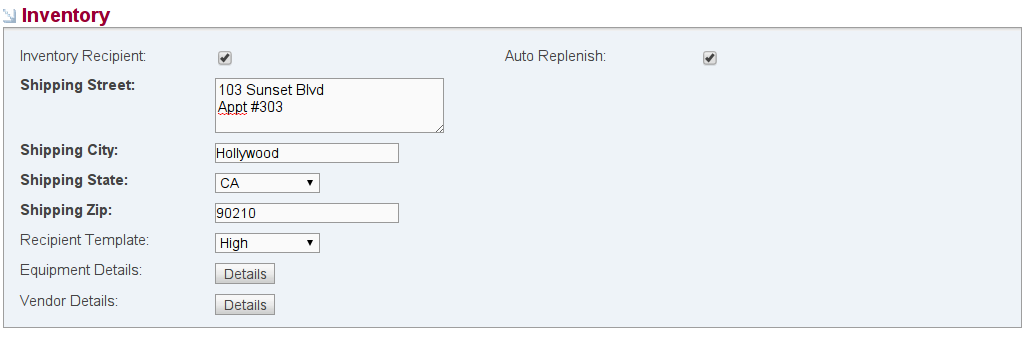
c) Shipping Street, City, State, Zip
Include the street address you want the items drop-shipped to. Generall,y only 2 lines are accepted, do not add a 3rd line. ADI has a 30 character per line limitation. If you go beyond 30 characters the order will fail. Then enter the shipping city, state, and zip.
d) Recipient Template
Select the recipeint template desired for the user or location. When selected, the base and minimum values from the template are applied to the recipient.
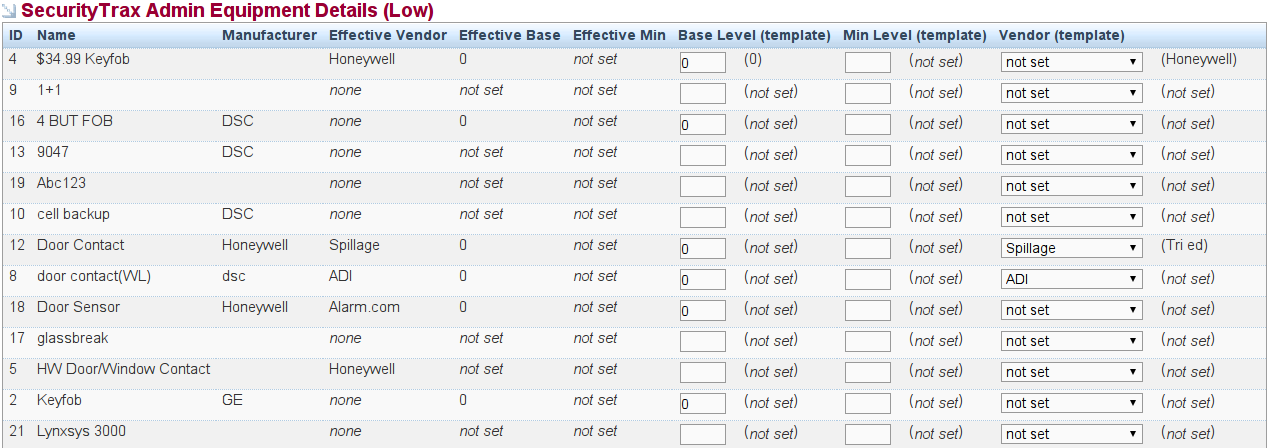
e) Equipment Details
The same screen and values that are available for the setup of the recipient templates are avilable in equipment details. Setting a value on this screen will override any values set elsewhere.
Note that you can use this screen to find the effective values for base/mins/etc.
NOTE
Reference the Recipient Templates section for more information.
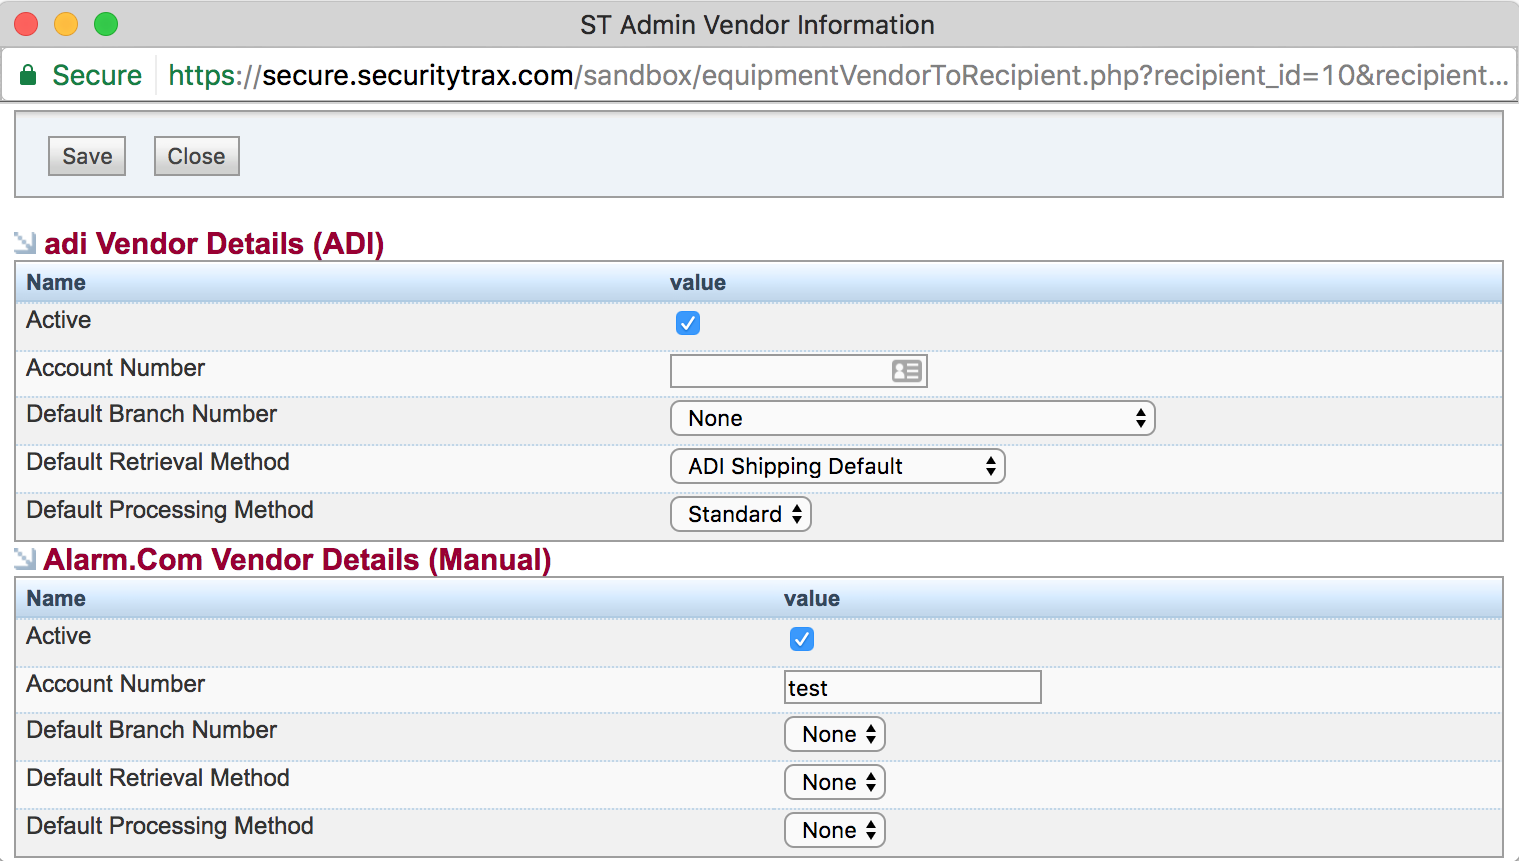
Vendor Details
This is where you set vendor specific details about the given recipient. Typically this is used to set vendor identifiers and default values used for POs.
**Note: The exception is Tri-ED. They only look at "Ship to ID's", which can be entered in Vendor Details under the Account Field.**
Active
You must select this to make the vendor a valid supplier for the given recipient.
Account Number
ADI - Set this to the recipient's suffix. Your list of suffixes can be provided by ADI upon request.
Tri-Ed - Set this to the recipient's shipto ID. Your list of shipto IDs can be provided by Tri-Ed upon request.
Branch Number
Only select the Branch Number if you have selected "pickup" as the delivery method. This will be the location you will pickup the items.
Default Retrieval Method
This is vendor specific but is generally self-explanatory. This is the method that will be used by default (ie: auto replenishing) but can be overriden when manually creating a PO.
Default Processing Method
This is the method of processing that will be used for this recipient/vendor combo by default (ie: auto replenishing) and can be overriden when manually creating a PO.
Available Options:
None (or blank)
This generally means the vendor is incapable of electronic ordering.
Manual
The PO will NOT be sent electronically. You must manually call/email/etc POs with this selected as the processing method.
Standard
The PO WILL be sent electronically. No manual intervention will be required for the vendor to receive the PO.
Setup Physical Inventory
Performing a physical inventory allows you to do physical counts as part of your setup (initial inventory levels) and on an ongoing basis. Typical usage includes monthly or bi-weekly physical counts.
Physical inventory can be completed by the recipient themselves using the self-service tools or administratively. What follows is the administrative style.
NOTE
Any changes in inventory levels due to physical counts will be recorded. You will have full transparency into equipment that 'disappears' due to physical counts.
To Perform a Physical Inventory:
- Click on the Administration Tab
- Click Create Physical Inventory under the Inventory & Equipment section
- Choose the appropriate recipient in the Recipient field
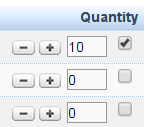
- Set the quantity for each item you have counted.
- You must check the box to the far right next to quantity otherwise the item is ignored. In the input field place the number you recently counted, not the adjustment to the current inventory level.
- Click Submit