8) Creating Partner Company, Lead Sources, Campaigns
As you enter Leads or Customers in SecurityTrax, you'll be required to select from where the Lead or Customer originated, and optionally, the Campaign used.
'Outside' Partner Companies are a source of the Lead or Customer that resides 'outside' of your company, while 'Inside' Partner Companies would refer to your own company.
Campaigns are a sub-group to further help identify how the Lead or Customer was generated.
For example, you might buy leads from a company named 'ABC Leads, Inc.' and they generate leads via cold calls, door knocking, or through the web. You'd create an 'outside' Partner Company named 'ABC Leads, Inc.' with Campaigns named 'Cold Call', 'Door Knock', and 'Web Lead'.
Additionally, not only can you set up SecurityTrax to distinguish between Partner Companies who provide you Leads and other Partner Companies who provide you with Customers, you can also create Partner Companies to which you sell Leads and/or Customers.
On the following steps, we'll discuss the various types of Lead Sources / Partner Companies and how to set them up in SecurityTrax for your company.
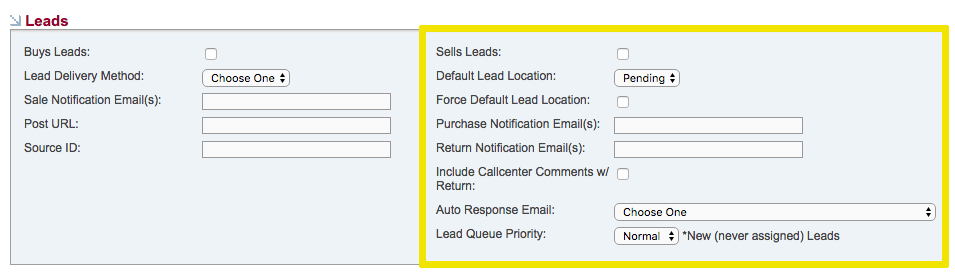
Sells Leads To You
To begin, let's create an outside Partner Company who 'Sells' only Leads to you in order to learn about the various settings which can be applied.
If you know of a company from which you currently purchase Leads you can enter their information, or you can enter 'Test Lead SELLER'. Follow the steps below to set up this type of Partner Company.
We're going to focus on the right hand side of the Leads section for this exercise because this Partner Company 'Sells' only Leads to your company. We'll address the left side of the Leads section and the Customer section later.
REMINDER: All BOLD fields are required in order to save.
- Click on the Administration tab
- Click Partner Companies under the Content Management section (you'll see the default 'HiValley' Partner Company)
- Click Add Partner Company
- Type the name of a company you use to purchase Leads in the Company Name field, or type 'Test Lead SELLER'. Fill in the remaining fields in the top section. The Contact Person would be your main contact at the Partner Company. The Notes section allows you to record any other information about the Partner Company.
- Click the 'Sells Leads' checkbox on the right side of the Lead section because this Partner Company is providing Leads to your company.
- Default Lead Location
Determine if the Leads received from this Partner Company will be marked as Pending or placed in your Queue.
Pending
A list of the Leads where action is needed. Leads assigned to Pending will not be assigned to any individual in your company. Access to Leads marked as Pending would only be available by clicking on the Leads tab if the User has the appropriate Permissions.
Queue
Allows Lead Reps to request Leads once company defined criteria has been met (i.e. timeframe to contact the Lead). Once the criteria is met the Lead would be available in the Queue to be requested by those with Permission to request Leads. Once requested, the Lead gets assigned to the User who requested it until the User converts it to a Customer, leaves it assigned to themselves, puts it back in the Queue (i.e. if the Lead wasn't home), or marks it as invalid.
- Force Default Lead Location
Check the box if you want to force your Default Lead Location upon the Lead being received.
When receiving Leads from an outside Partner Company they'll likely be using SecurityTrax to send them to you. The Partner Company might have the Lead set to Pending in their system, but you might want them marked as Queue. This checkbox allows you to force the Lead Location of your choosing in your instance of SecurityTrax.
- Purchase Notification Email(s)
Enter the email address where you'd like to have a notification sent for when a Partner Company sells you a Lead from their system.
- Return Notification Email(s)
If you're not interested in receiving the Lead from the outside Partner Company you can push it back to them and an email will be sent to the email address entered in this field.
You are able to push a Lead back to a Partner Company by going to the Leads tab, placing a checkmark to the left of each Lead you don't want, then clicking the Return button located just above the list of Leads.
- Include Call Center Comments w/ Return
Check the box if you want the Partner Company to receive notes regarding why a Lead was returned to them. (For example, the phone number was invalid, the Lead wasn't sure why they were being called, etc.)
- Auto Response Email
When sending a Lead back to a Partner Company you can use a predefined email template if you desire.
- Return Notification Email(s)
If you're not interested in receiving the Lead from the outside Partner Company you can push it back to them and an email will be sent to the email address entered in this field.
Create the predefined email template by going to the Administration Tab > Message Campaigns under Content Management (See 'Message Campaigns' in OnBoarding: Supplemental Tasks for more information).
- Lead Queue Priority
Establish whether Leads from this Partner Company are Normal, Medium, or High priority. If a Partner Company provides you with solid Leads you'll want to set them at a higher priority so Leads from that company appear at the top of the Lead list.
- Click Save
You now have a Partner Company who has been configured to Sell only Leads to you.
Sells Customers To You
Let's setup a Partner Company using the right side of the Customer section. This side is used if the Partner Company 'Sells' only Customers to your company.
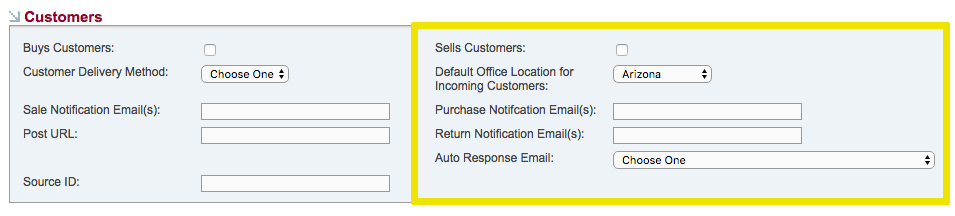
If you know of a company that currently sells Customers to you, enter their information, or you can enter 'Test Customer SELLER'. To set up this type of Partner Company:
REMINDER: All BOLD fields are required in order to save.
- Click on the Administration tab
- Click Partner Companies under the Content Management section
- Click Add Partner Company
- Type the name of a company who sells Customers to you in the Company Name field, or type 'Test Customer SELLER'. Fill in the remaining fields in the top section. The Contact Person would be your main contact at the Partner Company. The Notes section allows you to record any other information about the Partner Company.
- Click the 'Sells Customers' checkbox on the right side of the Customer section because this Partner Company sells Customers to your company.
- Default Office Location for Incoming Customers
Select your Office Location where you'd like to have the Customers you're purchasing assigned.
If you have multiple Office Locations but purchase Customers from the same Partner Company and wish to have the Customers assigned to the appropriate Office Location, you'll need to create a new Partner Company for each of your Office Locations.
- Purchase Notification Email(s)
Enter the email address where you'd like to have a notification sent for when a Partner Company sells you a Customer from their system.
- Return Notification Email(s)
If you're not interested in receiving the Customer from the outside Partner Company you can push it back to them and an email will be sent to the email address entered in this field.
You are able to push a Customer back to a Partner Company. Contact us through a SecurityTrax Ticket.
- Auto Response Email
When sending a Lead back to a Partner Company you can use a predefined email template if you desire.
Create the predefined email template by going to the Administration Tab > Message Campaigns under Content Management (See 'Message Campaigns' in OnBoarding: Supplemental Tasks for more information).
-
- Click Save
- Click Save
You now have a Partner Company who sells Customers to your company.
Buys Leads From You
Let's setup a Partner Company using the left side of the Leads section. This side is used if the Partner Company 'Buys' Leads from your company.
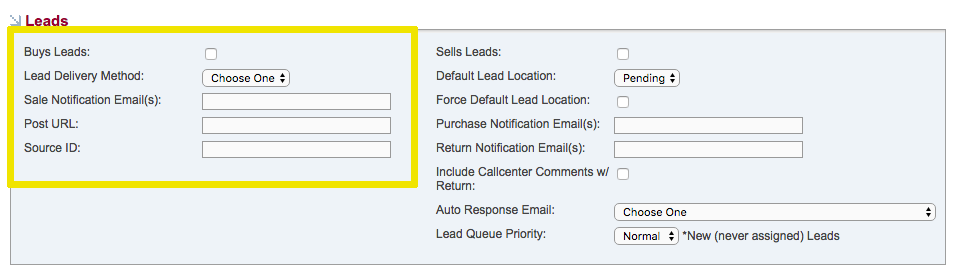
If you know of a company that currently purchases Leads from you can enter their information, or you can enter 'Test Lead BUYER'. To set up this type of Partner Company:
REMINDER: All BOLD fields are required in order to save.
- Click on the Administration tab
- Click Partner Companies under the Content Management section
- Click Add Partner Company
- Type the name of a company who purchases Leads from you in the Company Name field, or type 'Test Lead BUYER'. Fill in the remaining fields in the top section. The Contact Person would be your main contact at the Partner Company. The Notes section allows you to record any other information about the Partner Company.
- Click the 'Buys Leads' checkbox on the left of the Leads section because this Partner Company buys Leads from your company.
- Lead Delivery Method
Select whether the Partner Company will receive these Leads from you via SecurityTrax (which requires them to have their own instance of SecurityTrax) or email.
- Sale Notification Email(s)
The email address(es) for those at the Partner Company receiving the Lead you're selling to them.
- Post URL
If you're sending the Lead to the Partner Company via SecurityTrax and the Partner Company has their own instance of SecurityTrax then you would enter in the web address for the source of the Lead.
A representative from both your company and the receiving company will need to talk to SecurityTrax in order to have the URL generated. This is a one-time setup per Partner Company. Once the setup is complete you can push Leads to this Partner Company through SecurityTrax at anytime.
- Source ID
This is the SecurityTrax ID for the receiving party of the Lead. You'll need to contact SecurityTrax through a SecurityTrax Ticket (Step 2 of the Quick Start Guide) to obtain this number when you request the Post URL.
- Click Save
You now have a Partner Company who buys Leads from your company.
Buys Customers From You
Let's setup a Partner Company using the left side of the Customers section. This side is used if the Partner Company 'Buys' Customers from your company.
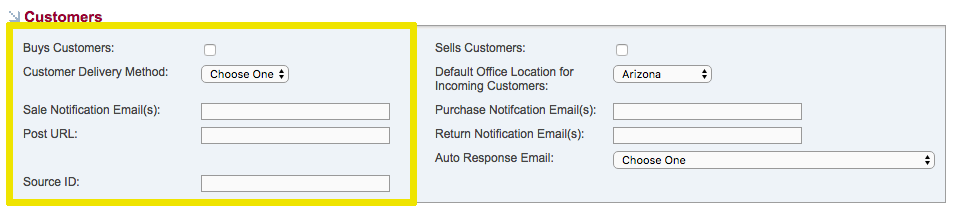
If you know of a company that currently purchases Customers from you can enter their information, or you can enter 'Test Customer BUYER'. To set up this type of Partner Company:
REMINDER: All BOLD fields are required in order to save.
- Click on the Administration tab
- Click Partner Companies under the Content Management section
- Click Add Partner Company
- Type the name of a company who purchases Customers from you in the Company Name field, or type 'Test Customer BUYER'. Fill in the remaining fields in the top section. The Contact Person would be your main contact at the Partner Company. The Notes section allows you to record any other information about the Partner Company.
- Click the 'Buys Customers' checkbox on the left of the Customer section because this Partner Company buys Customers from your company.
- Customer Delivery Method
Select whether the Partner Company will receive these Customers from you via SecurityTrax (which requires them to have their own instance of SecurityTrax) or email.
- Sale Notification Email(s)
The email address(es) for those at the Partner Company receiving the Customer you're selling to them.
- Post URL
If you're sending the Customer to the Partner Company via SecurityTrax and the Partner Company has their own instance of SecurityTrax then you would enter in the web address for the source of the Lead.
A representative from both your company and the receiving company will need to talk to SecurityTrax in order to have the URL generated. This is a one-time setup per Partner Company. Once the setup is complete you can push Customers to this Partner Company through SecurityTrax at anytime.
- Source ID
This is the SecurityTrax ID for the receiving party of the Customer. You'll need to contact SecurityTrax to obtain this number when you request the Post URL.
- Click Save
You now have a Partner Company who buys Customers from your company.
Self Generated Leads
Now let's create a 'Self-Generated' Partner Company so you can attribute Leads or Customers to your company as opposed to an 'Outside' Partner Company.
To set up a 'Self-Generated' Partner Company:
REMINDER: All BOLD fields are required in order to save.
- Click on the Administration tab
- Click Partner Companies under the Content Management section
- Click Add Partner Company
- Type 'Self-Generated' for the Company Name and fill in the remaining fields in the top section. The Contact Person would most likely be your Sales Manager, but it could be anyone in your company.
- Check the 'Sells Leads' checkbox in the Leads section AND / OR the 'Sells Customers' checkbox in the Customers section.
If checking the 'Sells Customers' checkbox you'll also need to select the Default Office Location for Incoming Customers.
- Click Save
SecurityTrax Access for Partner Company
In the SecurityTrax Access section located at the bottom of the Partner Creation screen, you're able to grant limited access to SecurityTrax to your outside Partner Companies.

- Click on the Administration tab
- Click Partner Companies under the Content Management section
- Click on the desired Partner Company then scroll to the bottom of the Partner Company screen to the SecurityTrax Access section
- Check the Allow Login box
- Type a Username
- Type a Password
- Send the Login URL to the Partner Company and provide the Username and Password to them. You're only providing them with limited, read-only access to only customer information where they have been assigned as the Partner Company.
Lead Campaigns
To create a Campaign, select a Partner Company you've created using the steps outlined on the previous pages, then follow these steps:
REMINDER: All BOLD fields are required in order to save.
- Click the Campaigns button located toward the middle of the screen, to the right of the Delete button. A small pop up window will appear.
- Give the Campaign a name (i.e. Cold Call, Door Knocking, Web, etc.)
- Enter a description if necessary.
- Select a direction depending if the Lead or Customer is Inbound to you from a Partner Company or Outbound from you to a Partner Company.
- Partner Company IDs & Campaign IDs: A Campaign can be auto-assigned to a customer when the customer is created via the API based on the partner company ID/campaign ID in the other company's system (e.g. the company that's using the API to create a customer in the system you're currently logged in to). You may need to submit a SecurityTrax ticket to obtain this information.