6) Shell Account with BRINKS
The BRINKS Dealer Portal tools are available to you right within SecurityTrax. When you click the BRINKS button on a Customer Record, you'll have the ability to complete the following items:
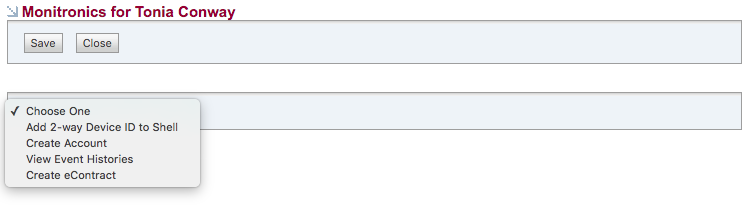
- Add 2-Way Device ID to Shell (it's recommended that this item is completed prior to 'Create Account')
- Create Account
- View Event Histories
- Create eContract
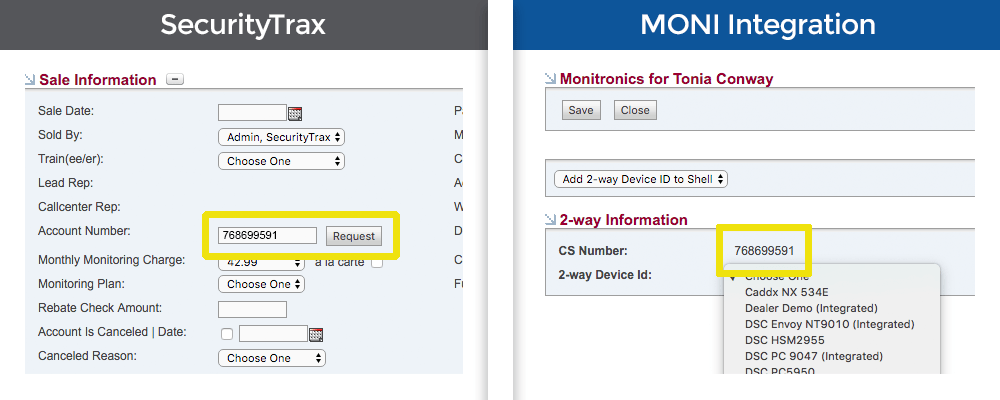
Add 2-way Device ID to Shell
This option places the account on 2-way test mode. It's recommended that this is completed prior to selecting the 'Create Account' option in the BRINKS integration. A successful 2-way test is required in order to get a 2-way account online. Successful 2-way tests are noted with a “2AC” event in the Event History.
- The 'Account Number' in SecurityTrax is the 'CS Number' in the BRINKS integration window. SecurityTrax will automatically enter the CS Number if you've entered the Account Number on the Customer Record in SecurityTrax prior to selecting 'Add 2-Way Device ID to Shell'.
- Select the appropriate 2-way Device ID, then click Save. The image below does not show all of the available options.
Create Account
Multiple tabs found in the BRINKS Dealer Portal have been consolidated to one 'Create Account' screen in SecurityTrax. Below you'll find descriptions of each of the main sections on the 'Create Account' window along with instructions. All values found in the drop-down menus in the 'Create Account' window are provided by BRINKS.
NOTE: Field names vary for the same piece of information between SecurityTrax and BRINKS. Where applicable, these differences are referenced in the images below.
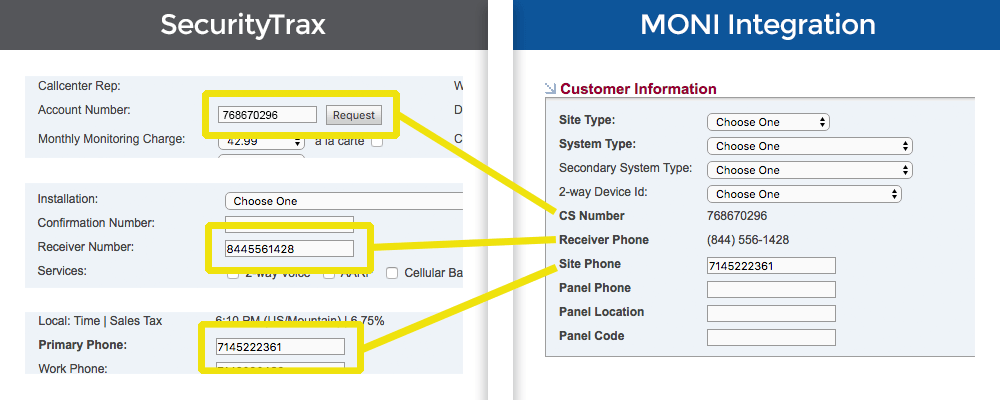
Customer Information
Select the appropriate values from the drop down menus based on the system installed. The CS Number, Receiver Phone, and Site Phone are entered onto the Customer Record in SecurityTrax. You'll need to enter the Panel Phone, Panel Location, and Panel Code in the BRINKS integration. (See Image 1)
Image 1
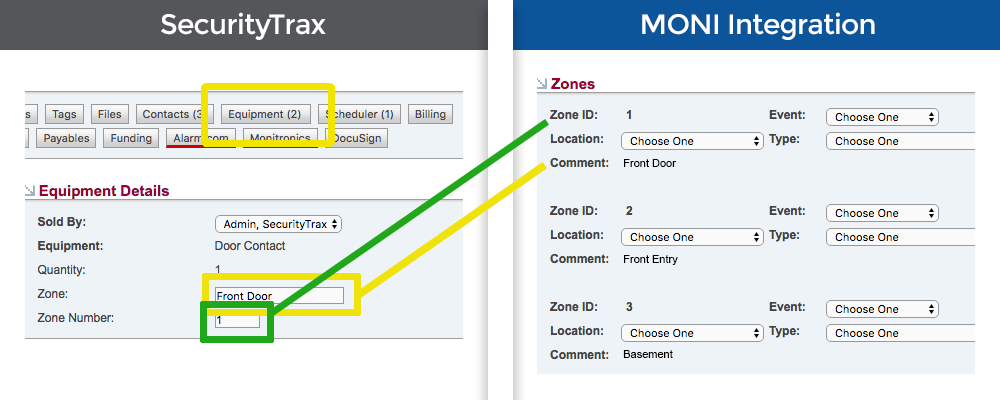
Zones
The Zone ID and Comment are entered in the Equipment button on the Customer Record in SecurityTrax. For easy reference, it's recommended the value entered for the Comment be as close to the options available in the Location drop-down menu provided by BRINKS. (See Image 2)
Image 2
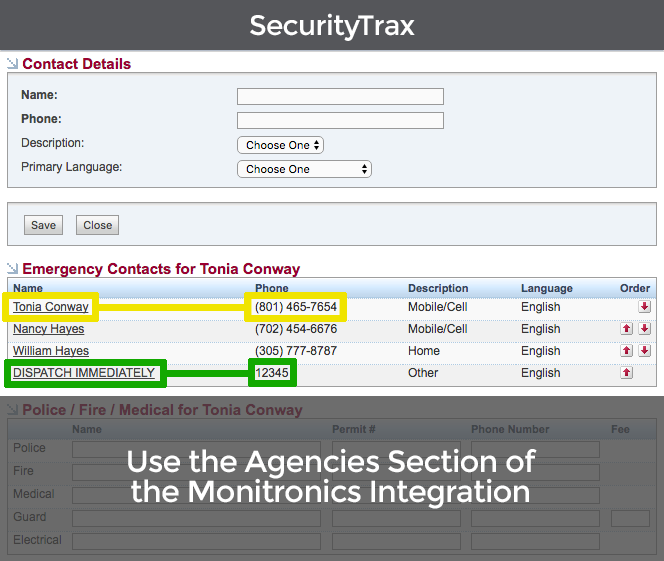
Contacts
The Name and Phone # are entered in the Contact button on the Customer Record. There must be a separate Contract Signer, Emergency Verification Contact (EVC), and contact with 'Has Key' checked. The 'Cell Primary 1st Contact' checkbox can be checked on any one of the Contacts.
BRINKS requires a 'Duress Code' as an Emergency Contact. Enter 'DISPATCH IMMEDIATELY' for the name and a numerical code as the phone number. SecurityTrax will automatically re-label it as a PIN in the BRINKS Integration. (See Images 3 & 4)
Image 3
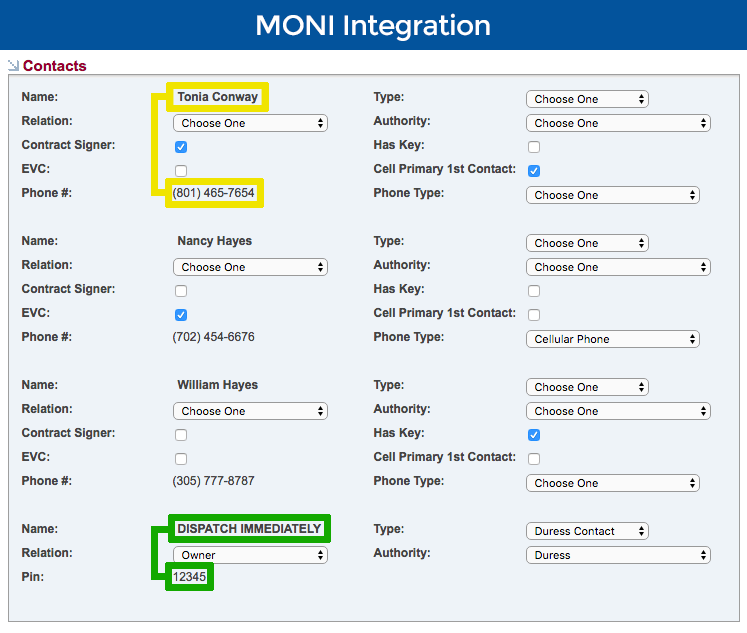
Image 4
Agencies
Use the Agencies section of the BRINKS integration to select the appropriate authorities. (See Image 5)
Image 5

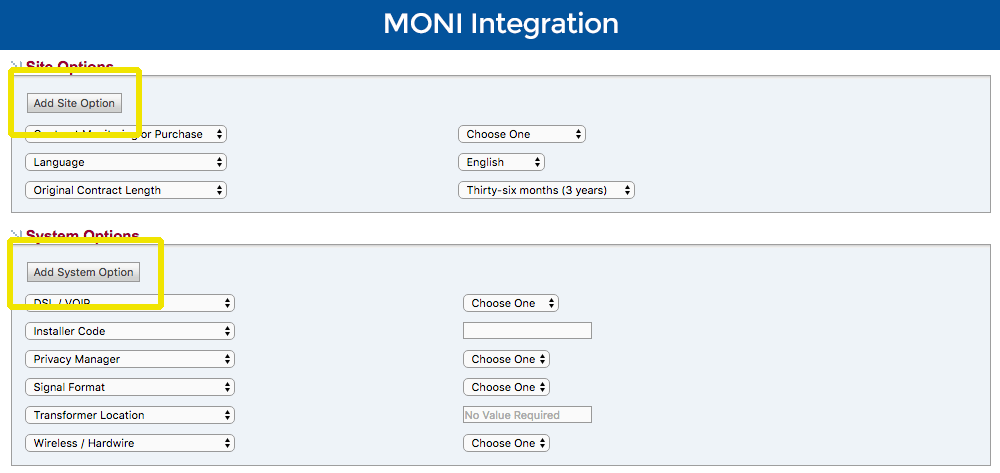
Site & System Options
All of the values in the drop-down menus in this section originate from BRINKS. The items shown by default represent the minimum options required by BRINKS and cannot be removed (i.e. Three default Site Options and six default System Options).
The drop-down menus on the left correlate with the values on the right. Make the applicable selections based on the system being installed then click Save.
Click 'Add Site Option' or 'Add System Option' buttons for additional rows if needed on a customer by customer basis. (See Image 6)
Image 6
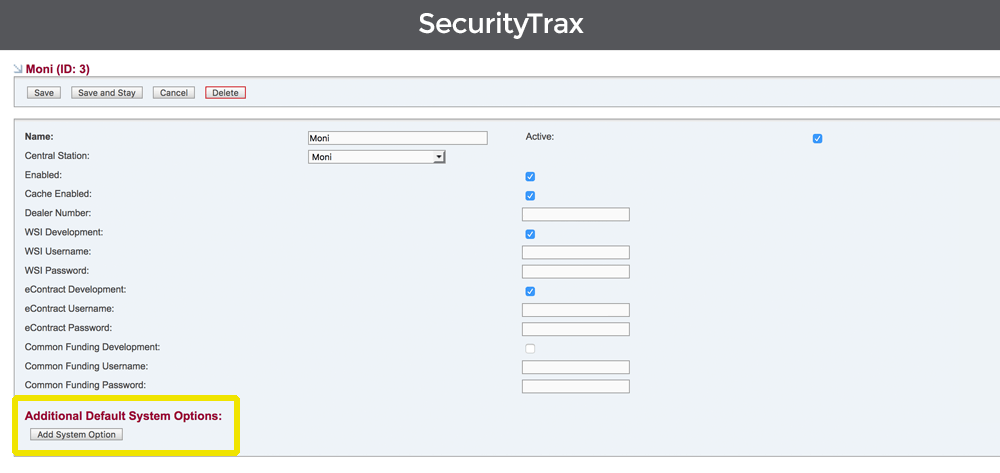
If additional default System Options are needed for all customers they can be added by following these steps:
- Click on the Administration tab
- Click on Monitoring Companies
- Click on the desired BRINKS central station
- Click 'Add System Option' and select the desired System Option. Repeat as needed. (See Image 7)
- Click Save or Save & Stay. Next time the BRINKS integration window is displayed the newly added System Options will be included in addition to the original default options.
- Follow these steps for each of your BRINKS central stations created under Monitoring Companies if necessary.
Image 7
NOTE: To remove System Options added using the steps above, select 'Choose One' in the drop-down menu for the item to be removed.
View Event Histories
This selection simply shows a log of the events that have been completed on the BRINKS system.
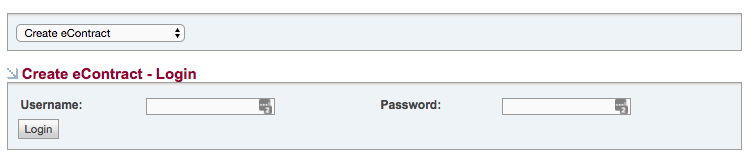
BRINKS eContract
Depending on whether 'Residential' or 'Commercial' was selected in the Account Type drop down menu on the Cusotmer Record determines which type of interface will be displayed.
Prior to creating an eContract in SecurityTrax, ensure an installation appointment has been assigned to the customer in the Scheduler on the Customer Record.
Begin by entering the appropriate credentials.
Residential
Several sections to address are displayed. SecurityTrax pre-fills information where possible. Below is a brief description of each section along wth any helpful tips.
BASIC INFORMATION
Embedded Signing will allow recipients to sign the contract right within SecurityTrax. Unembedded Signing will email a link to to the contract to each recipient. A PDF of the completed contract will automatically be saved in the Files button on the Customer Record ONLY when the Signing Type is set to Embedded Signing. Typically:
Embededed Signing = In-Person / Unembedded Signing = Sales over the phone
EQUIPMENT & INSTALLATION INFORMATION
Select the Equipment Alarm Network from the drop down. The Equipment Subtotal will be pre-populated based on the equipment total found in the Equipment tool on the Customer Record.
The Installation Start and Finish Dates will also be pre-populated as long as an appointment has been created on the customer in the Scheduler on the Customer Record. The eContract CANNOT be finished if an appointment hasn't been created.
INSURANCE & BILLING INFORMATOIN
Enter Months Paid Up Front, if any.
The Billing Start Date, Billing Address, and Payment Initial will pre-populate if those items have been entered in the Billing tool on the Customer Record. Values in the Discount Program are dependent on the credentials entered at the begining of the eContract process
ADDENDUM INFORMATION
Enter the appropriate information. A Personal Gaurantee requires additional information be entered.
SECONDARY SIGNER INFORMATION
Selecting Embedded or Unembedded Signing will require additional information be entered.
SURVEY QUESTIONS
Answer each question appropriately.
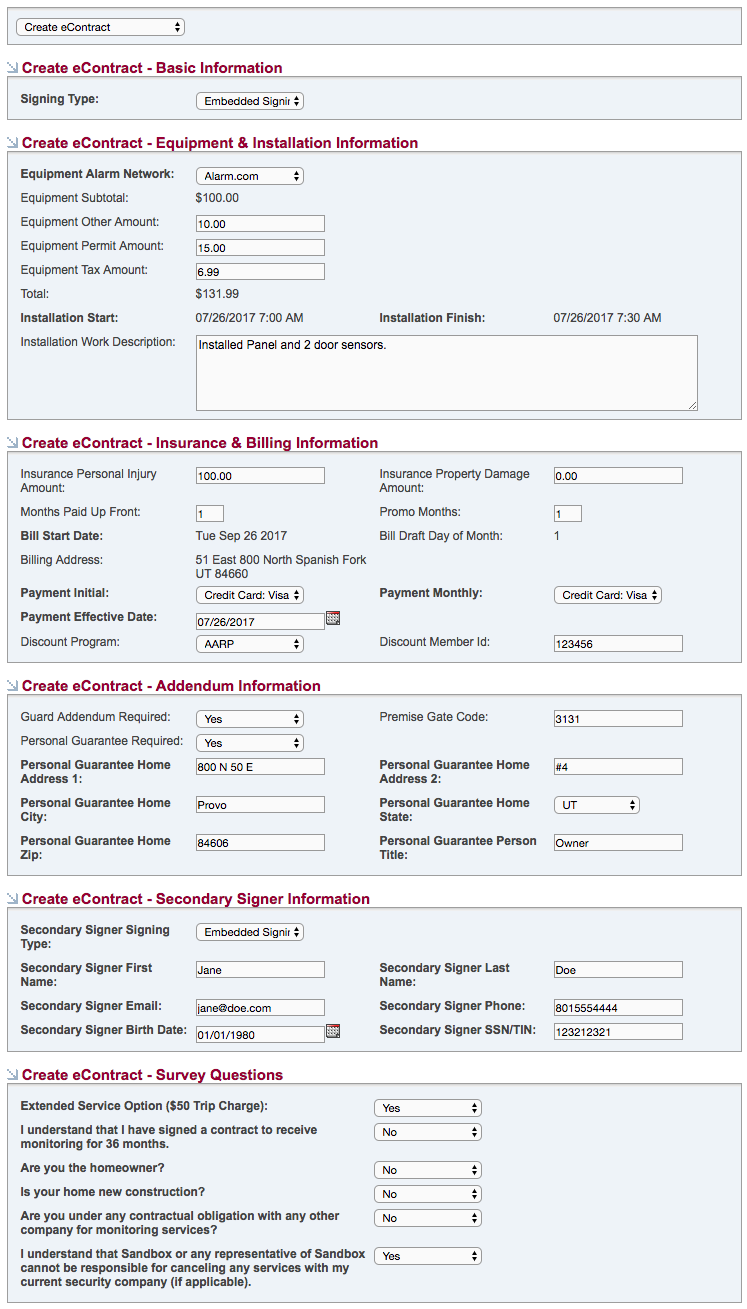
- Click Save in the upper left hand corner
Commercial
Several sections to address are displayed. SecurityTrax pre-fills information where possible. Below is a brief description of each section along wth any helpful tips.
BASIC INFORMATION
Embedded Signing will allow recipients to sign the contract right within SecurityTrax. Unembedded Signing will email a link to to the contract to each recipient. A PDF of the completed contract will automatically be saved in the Files button on the Customer Record ONLY when the Signing Type is set to Embedded Signing. Typically:
Embededed Signing = In-Person / Unembedded Signing = Sales over the phone
Select the appropriate Company Type.
UPLOAD ATTACHMENTS
Upload images of the requested documents. Only .png and .jpg file types are supported. There's a 4mb file size limit for each image. If multiple docs exist for a line item place docs side-by-side and photograph with a smartphone for upload.
EQUIPMENT & INSTALLATION INFORMATION
Select the Equipment Alarm Network from the drop down. The Equipment Subtotal will be pre-populated based on the equipment total found in the Equipment tool on the Customer Record.
The Installation Start and Finish Dates will also be pre-populated as long as an appointment has been created on the customer in the Scheduler on the Customer Record. The eContract CANNOT be finished if an appointment hasn't been created.
INSURANCE & BILLING INFORMATOIN
Enter Months Paid Up Front, if any.
The Billing Start Date, Billing Address, and Payment Initial will pre-populate if those items have been entered in the Billing tool on the Customer Record. Values in the Discount Program are dependent on the credentials entered at the begining of the eContract process
ADDENDUM INFORMATION
Enter the appropriate information. A Personal Gaurantee requires additional information be entered.
SECONDARY SIGNER INFORMATION
Selecting Embedded or Unembedded Signing will require additional information be entered.
SURVEY QUESTIONS
Answer each question appropriately.
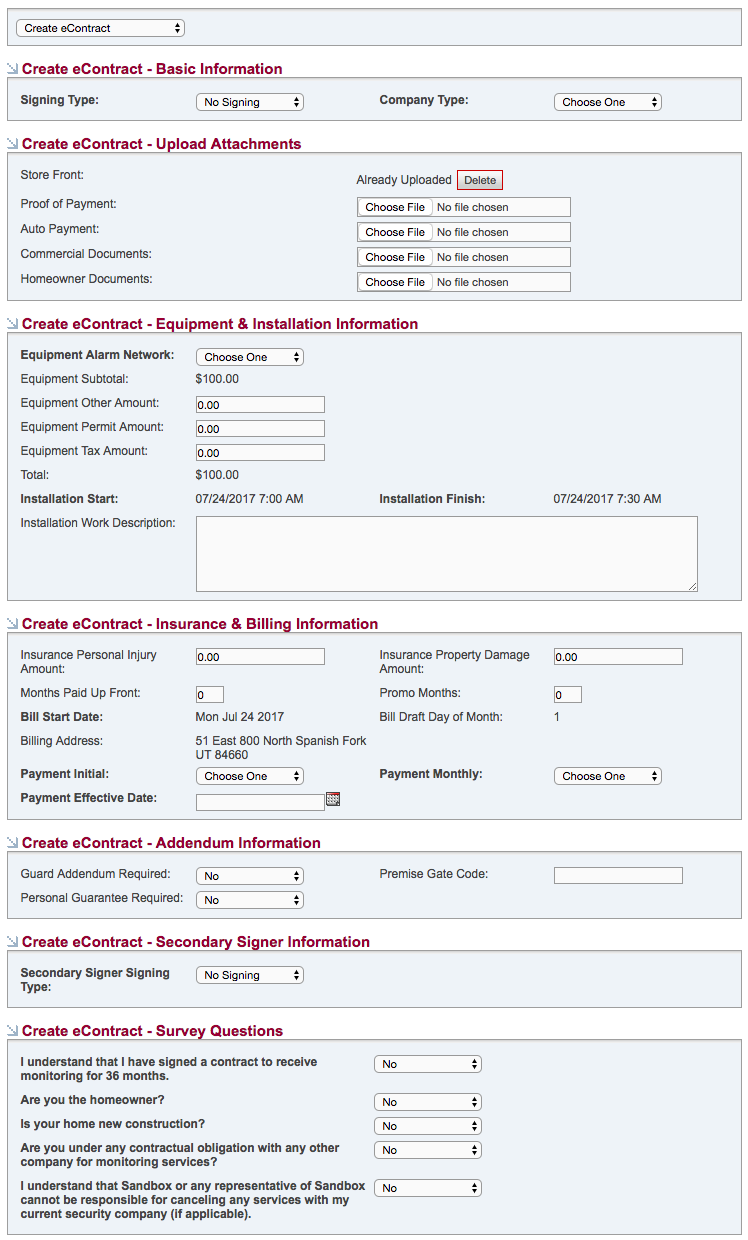
- Click Save in the upper left hand corner