Customer Funding
Customer Funding entries will help you keep track of the status of progress, outcome, and transactions for each entry. To learn how to set up Funders, Funder Selection Reasons, and Funding Transaction Types click here.
Terms
Amount Expected
The total amount that the Funder is expected to pay.
Amount Received
Total amount of funds received from the Funder.
Difference from Expected
This is the outstanding amount: The difference in sum collected and expected amount.
Funder
The dealer or entity that is providing the funding.
Funding List
List of sortable entries for Funding
ID: This is the funding entry ID. By default the list is sorted by ID descending (newest at the top). You can change the sort order by clicking the arrows next to the header.
Date Added: This is the date the funding entry was created.
Funder: The name of the entity that is providing the funding.
Amount Expected: The amount expected to be funded.
Amount Received: Sum of the total amount received.
Status: The status of the funding entry.
Funding Outcome: The status of the amount expected.
Funder Selection Reason
The reason for selecting this Funder.
Funding Status
Progression of the Funding entry can be tracked using the Progress Statuses. These status are: Pending; Ready; Submitted; In Review; and Complete
Funding Transaction Type
The type of transaction being added to a Funding entry. By default, all sites will have 3 types pre-created: Chargeback; Funding; and Holdback
Funding Outcome
The status of the amount expected. These include: Paid in Full; Partially Paid; Non-Fundable; and Rejected
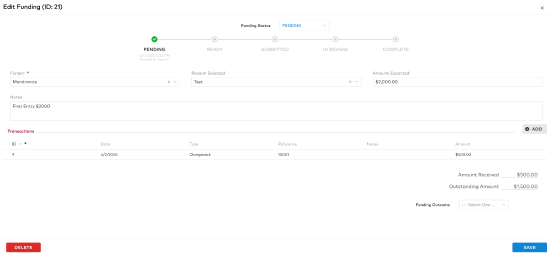
Manage a Funding Entry
Modal that allows you to view the Funding Status. Here is a description of everything you will find here:
Funding Status: On create, the Funding status is set to Pending. As the status progresses, you can update this to the status that best fits.
Note: You can move to any status at any time.
Funder: This will be the same Funder that was selected on the creation of the entry. You can change this at any time.
Reason Selected: This will be the same Reason that was selected on the creation of the entry. You can change this at any time.
Amount Expected: This will be the same Amount that was selected on the creation of the entry. You can change this at any time.
Notes: Add any notes that pertain to this entry.
Amount Received: Total sum of amount received in the transactions.
Difference from Expected: This is the outstanding amount: The difference in sum collected and expected amount.
Funding Outcome: The status of the amount expected.
Reference
This can be any reference number or ID that will help identify the specific Funding entry.
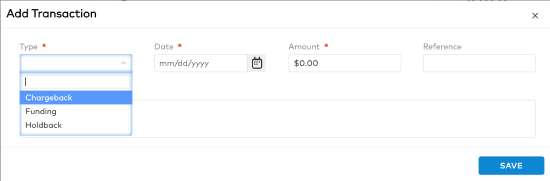
Transactions
List of transactions that have occurred
Type: Select the type of transaction
Date: Date of the transaction
Amount: Amount of the transaction. This amount will be deducted from the amount expected to show the outstanding amount. Note: When a transaction is indicating an amount that will not be paid, enter this as a negative number.
Reference: This can be any ID or number for the transaction.
Note: Add any notes that pertain to the transaction.
Funding List
Customer Funding is located in the Accounting tab of a Customer record.
To navigate there follow these steps:
- While in the Customer record, select Accounting.

- Navigate to the Funding section.

Note: The Funding List will include existing Funding Entries.
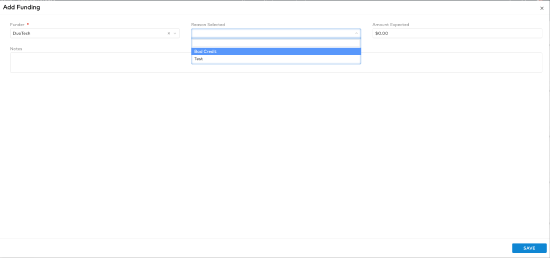
Create a Funding Entry
- In Funding, select Add.
- Select a Funder from the dropdown list.
- Select Reason Selected from the drop-down menu (optional).
- Enter Amount Expected.
- Click Save.
Manage a Funding Entry
- Select an existing entry from Funding
- Select a different Funding Status from the drop-down menu.
- Update any information that is required
- Select Save
Manage Transactions
The transaction allows you to create a new transaction or update one.
To create a new transaction:
- Select Add for a new Transaction or Select an existing Transaction
- Select Transaction Type from the dropdown menu: Chargeback, Funding, Holdback
- Enter the Date
- Enter the Amount
- Enter Reference (optional)
- Select Save
Example of adding a new Transaction
To update an existing Transaction:
- Select an existing Transaction
- Select Transaction Type
- Enter Date
- Enter Amount
- Enter Reference (optional)
- Select Save
Example of updating an existing Transaction
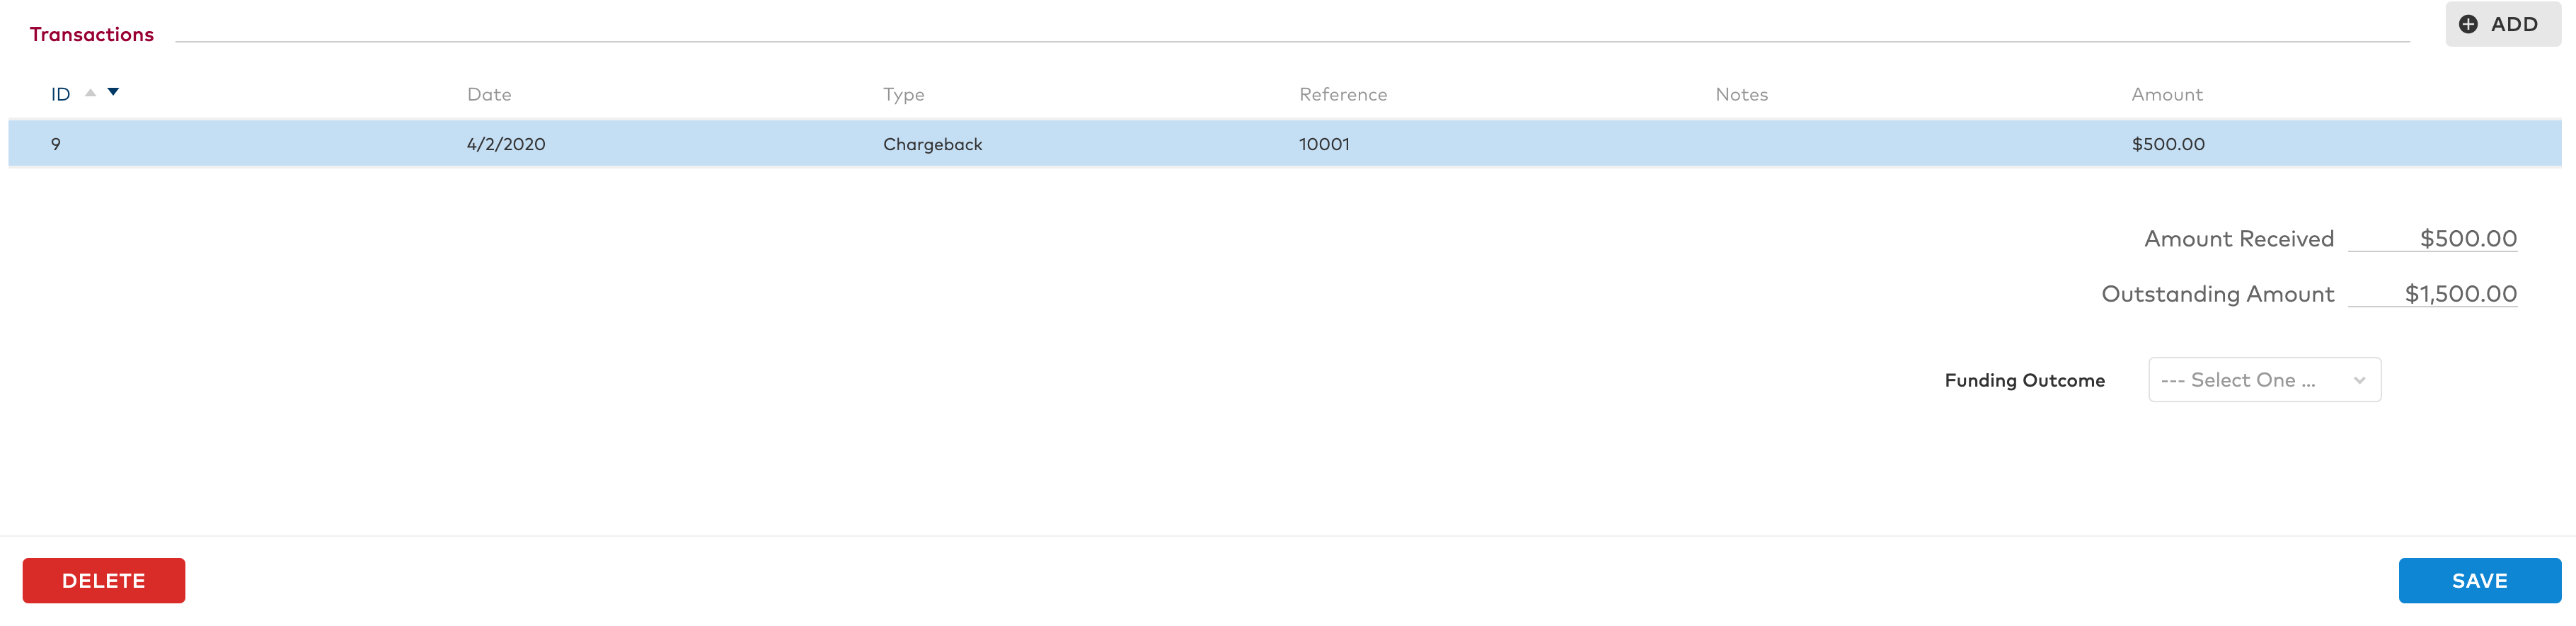
Example of updating the information required
